


In this series of posts I’m going to explore in detail how to boot Linux in an Olimex A20-OLinuXino-LIME2 board. The family of devices based on ARM Allwinner SoCs are usually known as sunxi, in particular, our A20 SoC belongs to the sun7i family.
This process can be done manually by compiling a toolchain, the bootloader, the kernel and creating the root file system manually, however I’m going to taken a shortcut by using Buildroot to generate the images, though I will flash them one by one and modify them slightly. If you want to know how to do it without relying on a build system, Bootlin has some great material from their trainings.
Let’s get started. First of all we are going to generate all the images:
$ make olimex_a20_olinuxino_lime2_defconfig
$ make all -j4
Now it’s a good time to grab a [few] cup[s] of coffee, because Buildroot is compiling a toolchain, U-Boot, the Kernel and a few extra tools such as Busybox. This will take quite some time, but once it’s done, we will have the following images ready to be flashed:
$ ll output/images
total 32M
-rw-r--r--. 1 xabi xabi  294 Mai  9 15:28 boot.scr
-rw-r--r--. 1 xabi xabi  60M Mai  9 15:28 rootfs.ext2
lrwxrwxrwx. 1 xabi xabi   11 Mai  9 15:28 rootfs.ext4 -> rootfs.ext2
-rw-r--r--. 1 xabi xabi  61M Mai  9 15:28 sdcard.img
-rw-r--r--. 1 xabi xabi  26K Mai  9 15:21 sun7i-a20-olinuxino-lime2.dtb
-rw-r--r--. 1 xabi xabi 502K Mai  9 15:28 u-boot.bin
-rw-r--r--. 1 xabi xabi 534K Mai  9 15:28 u-boot-sunxi-with-spl.bin
-rw-r--r--. 1 xabi xabi 4,1M Mai  9 15:21 zImage
At this point we could simply flash sdcard.img with dd if=output/images/sdcard.img of=/dev/sdX and we would have a working custom Linux system (isn’t it amazing?), but that’s not the end goal today. Instead, we want to see the guts of the system.
System Bootstrap
The first step is to bring up the main board peripherals, in most cases the vendor provides a small piece of code that takes care of this. For instance, according to the Allwinner A20 User Manual, the SoC includes a BROM (i.e. bootstrap code in ROM) that supports:
- System boot from NAND Flash, SPI Nor Flash (SPI0), SD Card/TF card (SDC0/2)
- System code download through USB OTG (USB0)
The boot sequence is the following:
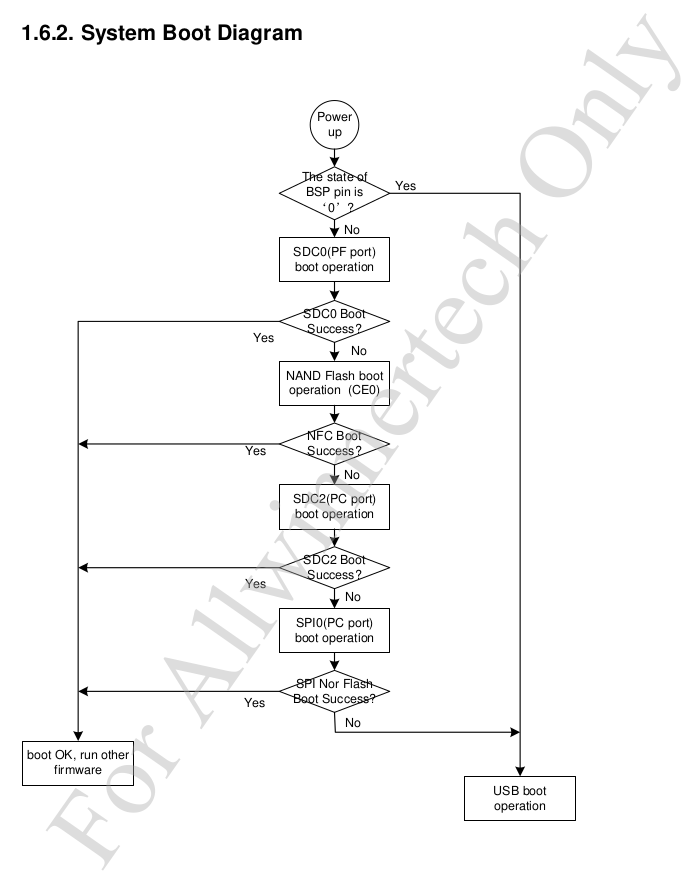
Allwinner A20 BROM Sequence
In our case, we are going to boot from the SD Card, and the BROM expects the bootloader to be located after sector 16. To be more precise, the expected SD Card layout is the following:
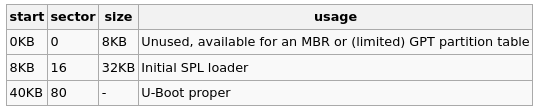
Allwinner A20 BROM Partitions
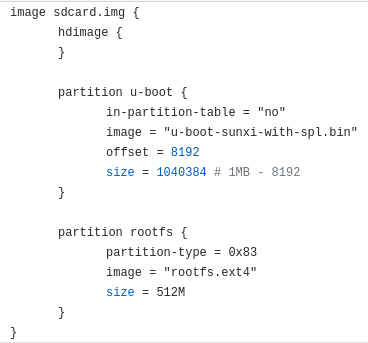
I’ve found this table in the Community-maintained Sunxi wiki, but another good source of information (and other info that I will use in the following steps) is the Buildroot documentation. For instance, you can go to the directory that contains the configuration of this board (board/olimex/a20_olinuxino and open genimage.cfg).
Allwinner A20 BROM Partitions
Bootloader
Our bootloader of choice is going to be U-Boot, and as you could see in the previous table, this board needs a two-stage bootloader. The U-Boot SPL (Secondary Program Loader) is a small second stage bootloader in charge of preparing everything to run a complete instance of U-Boot.
At this point we are going to check the Buildroot output directory and look for U-Boot image. The file we need is u-boot-sunxi-with-spl.bin. This file includes the two stages, so we need to flash it starting at address 8kB.
WARNING: replace /dev/sdX by your SD card device
$ sudo dd if=/dev/zero of=/dev/sdX bs=1M count=1 # erase the contents of the card
$ sudo dd if=output/images/u-boot-sunxi-with-spl.bin of=/dev/sdX bs=1024 seek=8
Now, if we insert the SD Card and boot the board we will see the following coming out through the serial port of our board:
$ picocom -b 115200 /dev/ttyUSB0

U-Boot SPL 2020.04 (May 09 2020 - 15:28:17 +0200)
DRAM: 1024 MiB
CPU: 912000000Hz, AXI/AHB/APB: 3/2/2
Trying to boot from MMC1

U-Boot 2020.04 (May 09 2020 - 15:28:17 +0200) Allwinner Technology

CPU:   Allwinner A20 (SUN7I)
Model: Olimex A20-OLinuXino-LIME2
I2C:   ready
DRAM:  1 GiB
MMC:   mmc@1c0f000: 0
Loading Environment from FAT... Unable to use mmc 0:0... In:    serial
Out:   serial
Err:   serial
Allwinner mUSB OTG (Peripheral)
Net:   eth0: ethernet@1c50000
Warning: usb_ether using MAC address from ROM
, eth1: usb_ether
starting USB...
Bus usb@1c14000: USB EHCI 1.00
Bus usb@1c14400: USB OHCI 1.0
Bus usb@1c1c000: USB EHCI 1.00
Bus usb@1c1c400: USB OHCI 1.0
scanning bus usb@1c14000 for devices... 2 USB Device(s) found
scanning bus usb@1c14400 for devices... 1 USB Device(s) found
scanning bus usb@1c1c000 for devices... 1 USB Device(s) found
scanning bus usb@1c1c400 for devices... 1 USB Device(s) found
       scanning usb for storage devices... 0 Storage Device(s) found
Hit any key to stop autoboot:  0
Of course, nothing will boot because we haven’t flashed the kernel yet, and before doing that we need to understand how it knows what to boot.
By default, the process is a bit hard to follow because it tries to boot from several devices, but at the end, it all runs down to bootcmd and bootargs environment variables in U-Boot. For simplicity, instead of using what Buildroot generated we are going to modify these two variables to load the Kernel through TFTP. This is a very useful technique during development because we don’t need to flash our board every time we want to test new changes!
Modifying the environment variables
First of all, if you’ve paid attention to the previous log, you might have seen a suspicious message saying Loading Environment from FAT... Unable to use mmc 0:0. That’s because our U-Boot is configured to load the variables from the first FAT partition marked as bootable. However, we have not created any partition yet, so we will not be able to modify the variables.
If we tried to modify them now, we would see the following error message:
=> setenv serverip 192.168.10.9
=> saveenv
Saving Environment to FAT... Unable to use mmc 0:0... Failed (1)
To overcome this issue we are going to create the following partitions using cfdisk, gpartedor your tool of choice. We must create the following partitions:
- Empty/raw partition where U-Boot will be saved. Since our binary size is roughly 600 kiB, we will reserve 1 MiB, that gives us enough room to add more features to the bootloader.
- FAT16 partition to save the U-Boot variables. According to U-Boot configuration, it just needs 128 kiB, but the minimum size supported by FAT16 is 16MiB, so let’s pick that. This one must be marked as bootable.
$ sudo fdisk -l /dev/sdX
Disk /dev/sdb: 15 GiB, 16106127360 bytes, 31457280 sectors
Disk model: SDDR-B531
Units: sectors of 1 * 512 = 512 bytes
Sector size (logical/physical): 512 bytes / 512 bytes
I/O size (minimum/optimal): 512 bytes / 512 bytes
Disklabel type: dos
Disk identifier: 0xcaa3f0cc

Device     Boot Start   End Sectors Size Id tipo
/dev/sdb1        2048  4095    2048   1M  0 Empty
/dev/sdb2  *     4096 36863   32768  16M  6 FAT16
Now we will flash again U-Boot because most probably we’ve wiped out our SD Card during the process, so run again sudo dd if=output/images/u-boot-sunxi-with-spl.bin of=/dev/sdX bs=1024 seek=8 and insert the card into the board. If you boot the Olimex and try to save a few variables you will see the following success message:
=> setenv ipaddr 192.168.10.10
=> setenv serverip 192.168.10.9
=> saveenv
Saving Environment to FAT... OK
Now that we have full control over U-Boot, the next step is to boot the kernel, but I will explain you how to do that in the next post.
Wrapping up
On this board there are three bootloader stages which end up loading the kernel and the rootfs. Everything is designed in such a way that many different configurations are possible. For instance, U-Boot can load the kernel from an SD Card, from a NAND Flash memory, from a TFTP server…

We have just scratched the surface of this technology, but it’s already clear that the art of embedded Linux is simple yet powerful at the same time. After this learning experience I’ve really started to appreciate all the effort done by the Linux Community to make these set of tools available to anyone for free. Long live to Open Source!