

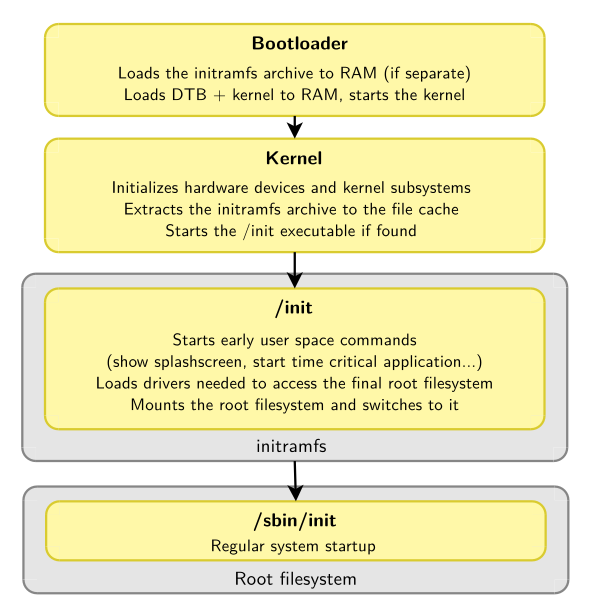
After Part 1 and Part 2, this is going to be the last post of the Booting Linux on an Olimex boardseries. In the last post we left it right after launching the Kernel, however, according to Bootlin training docs, for a Linux system to work, we need at least a few applications:
- An init application, which is the first user space application started by the Kernel after mounting the root filesystem
- A shell, to implement scripts, automate tasks, and allow a user to interact with the system
- Basic UNIX executables, for use in system scripts or in interactive shells: mv, cp, mkdir, cat, modprobe, mount, ifconfig, etc.
In embedded systems, all these are usually provided by Busybox, which is already built into our filesystem by Buildroot. The entire launch process is depicted below:
Generating the file system
We will be using TFTP again, this time around to load a file system (rootfs) into RAM. Then we are going to tell the Kernel to use that rootfs.
There are many different types of file systems, the one we will use is called initramfs. As the name implies, the file system is loaded into RAM, so all the contents will be lost after power off, but thanks to that everything we’ll use will be loaded into RAM (except the U-Boot configurations, which are in the SD card, as explained in part 1).
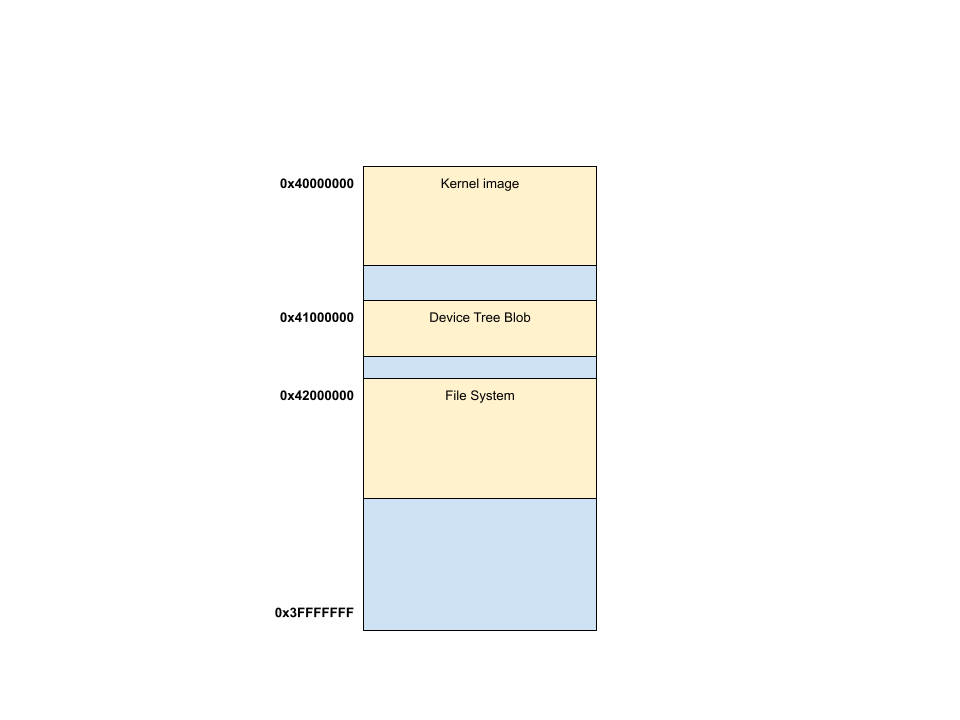
At the end of the process, our RAM layout will be the following:
First of all we have to tell Buildroot to generate the initramfs for us. To modify these settings we have to run make menuconfig inside the Buildroot directory. Once we are inside the configuration menu, we have to go into Filesystem images **and toggle cpio the root filesystem (for use as an initial RAM filesystem) as well as select the Compression method as gzip. In case you are wondering what cpio means, the official documentation contains a good historical explanation.
Once you are done, your configuration should look like the screenshot below:

This time we will need three different files:
- The Kernel image (
zImage) - The device tree blob (
sun7i-a20-olinuxino-lime2.dtb) - The root file system (
rootfs.cpio.gz)
=> tftp 0x40000000 zImage
Speed: 1000, full duplex
Using ethernet@1c50000 device
TFTP from server 192.168.1.137; our IP address is 192.168.1.99
Filename 'zImage'.
Load address: 0x40000000
Loading: #################################################################
	 #################################################################
	 #################################################################
	 #################################################################
	 #################################################################
	 ########
	 5.5 MiB/s
done
Bytes transferred = 4881968 (4a7e30 hex)
=> tftp 0x41000000 sun7i-a20-olinuxino-lime2.dtb
Speed: 1000, full duplex
Using ethernet@1c50000 device
TFTP from server 192.168.1.137; our IP address is 192.168.1.99
Filename 'sun7i-a20-olinuxino-lime2.dtb'.
Load address: 0x41000000
Loading: ##
	 4.2 MiB/s
done
Bytes transferred = 26282 (66aa hex)
=> tftp 0x42000000 rootfs.cpio.gz
Speed: 1000, full duplex
Using ethernet@1c50000 device
TFTP from server 192.168.1.137; our IP address is 192.168.1.99
Filename 'rootfs.cpio.gz'.
Load address: 0x42000000
Loading: #################################################################
	 #################################################################
	 #################################################################
	 #################################################################
	 #################################################################
	 #################################################################
	 #################################################################
	 ##################################
	 5.5 MiB/s
done
Bytes transferred = 7172268 (6d70ac hex)
Let’s now launch the Kernel using bootz command. Like any other command, we can type help bootz to understand how to use it. As we explained in part two, this command needs tree arguments:
- The address of the Kernel in RAM
- The address of the rootfs plus its size
- The address of the device tree blob
=> bootz 0x40000000 0x42000000:0x6d70ac 0x41000000
Kernel image @ 0x40000000 [ 0x000000 - 0x4a7e30 ]
## Flattened Device Tree blob at 41000000
   Booting using the fdt blob at 0x41000000
EHCI failed to shut down host controller.
   Loading Ramdisk to 49928000, end 49fff0ac ... OK
   Loading Device Tree to 4991e000, end 499276a9 ... OK
DE is present but not probed

Starting kernel ...

[    0.000000] Booting Linux on physical CPU 0x0
[....]
[....]
[    2.057496] Run /init as init process
Starting syslogd: OK
Starting klogd: OK
Running sysctl: OK
Saving random seed: [    2.295043] random: dd: uninitialized urandom read (512 bytes read)
OK
Starting network: OK

Welcome to OLinuXino!
a20-olinuxino login:
And here it is! The shell is already asking for our username, which is root by default. Let’s see what happens when we type that and a simple command like ls:
a20-olinuxino login: root
# ls /
bin      etc      lib32    mnt      root     sys      var
boot     init     linuxrc  opt      run      tmp
dev      lib      media    proc     sbin     usr
Finally, as we did before, in U-Boot we can save the boot sequence so that it’s run automatically after boot:
=> setenv bootcmd 'tftp 0x40000000 zImage; tftp 0x41000000 sun7i-a20-olinuxino-lime2.dtb; tftp 0x42000000 rootfs.cpio.gz; bootz 0x40000000 0x42000000:0x6d70ac 0x41000000'
=> saveenv
Conclusions
I hope you’ve found insightful this series of posts. I’m leaving it here, but Linux (and embedded Linux) is full of features to test and explore. Instead of using TFTP we can load the system from the SD card, we can use another file system, we can try to update the Kernel… And we haven’t reached the user space yet!
There are many online resources about embedded Linux, like the already mention Bootlin training courses, it’s freely available documentation, the official Kernel docs or even books like Mastering Embedded Linux Programming.